Your First Project
Learn how to create and organize your StoryFlow Editor projects. This guide covers project structure and common patterns.
Creating a New Project
When you create a new project in StoryFlow Editor, the application sets up a complete folder structure on your computer. Understanding this structure will help you organize your interactive stories effectively, especially as they grow in complexity.
To create a new project:
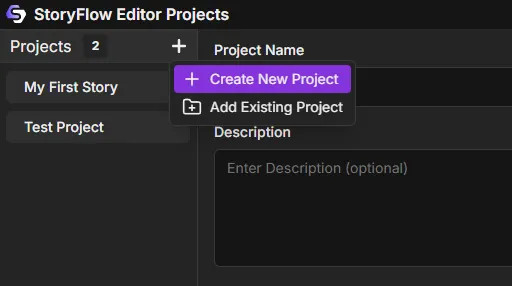
- Open StoryFlow Editor and you'll see the Projects Window
- Click the New Project button at the bottom of the project rail
- Enter a descriptive project name (letters, numbers, spaces, hyphens, and underscores only)
- Choose a save location on your computer (e.g., Documents/StoryFlow Projects/)
- Optional: Add a description to help you remember what the project is about
- Optional: Check "Initialize Git repository" for version control
- Pick a Project Template (Example or Empty — see below)
- Click "Create Project"
StoryFlow Editor will create a new folder at your chosen location with the project name. Inside, it generates the files and folders for the template you picked so you can get started immediately.
Tip: Add an Existing Project
Already have a StoryFlow project on disk? Click the Add Existing Project button at the bottom of the project rail (next to New Project), then select its .storyflow file to add it to your projects list.
Choosing a Project Template
Before you click Create Project, you choose a Project Template. This determines what files and folders StoryFlow Editor generates for you.
Example vs Empty
- Example Project (default, recommended for new users) — copies the bundled sample project so you have something to explore right away. It includes several scripts (an intro, a city, a merchant, combat, and more), character files, images, audio, a User Interface, and a global-variables file.
- Empty Project — gives you a clean slate: a single
Script_Menu.sfescript containing just one Start node, and nothing else.
If you're new to StoryFlow, start with the Example Project — reading through a working story is the fastest way to learn how the nodes fit together. Choose Empty Project when you want to build from scratch without removing sample content first.
Opening Projects Across Versions
StoryFlow Editor records the version it was created with inside each project. When you open a project that was saved by a different version of the editor, a compatibility dialog appears before the project loads.
Note: Version Mismatch Prompt
You'll be offered three choices:
- Cancel — don't open the project
- Open Anyway — open the project as-is
- Backup & Open — copy the entire project folder to a timestamped backup beside the original first, then open
Choosing Backup & Open is the safe option when opening an older project in a newer editor, since opening it may run upgrade migrations on the files. The backup is a full copy of the folder, so you always have the original to fall back on.
Understanding Project Structure
Each StoryFlow project follows a simple, organized folder structure. All your story content lives inside the project directory, making it easy to backup, share, or move your projects between computers.
Here's what a project looks like on disk. An Example Project is created with the bundled sample content:
MyAdventureGame/
├── MyAdventureGame.storyflow    # Project metadata file
├── global-variables.json        # Global variables (shared across scripts)
├── project-background.png       # Hero background shown in the launcher
├── project-icon.png             # Project icon (present once you set one)
├── content/                     # All content lives here
│   ├── scripts/                 # Your story scripts
│   │   ├── Script_Menu.sfe       # Default startup script
│   │   ├── Script_Intro.sfe
│   │   └── …
│   ├── Characters/              # Character files (.sfc)
│   ├── Images/                  # Image assets
│   ├── Audio/                   # Audio assets
│   ├── User_Interface.sfui      # Default UI
│   └── Font_Merriweather.ttf    # A bundled font
└── .gitignore                   # If Git was initialized
An Empty Project is much smaller — just the project file plus a single starter script:
MyAdventureGame/
├── MyAdventureGame.storyflow    # Project metadata file
└── content/
    └── scripts/
        └── Script_Menu.sfe       # A single Start node
Key Files Explained
- *.storyflow file: Contains project settings — name, description, the startup script and Default UI, folder colors, favorite folders, and audio-channel settings
- global-variables.json: Stores variables shared across all scripts
- *.sfe files: StoryFlow Editor script files containing your nodes, connections, and local variables
- content folder: The root folder for all your scripts and assets
Adding Scripts
Scripts are the building blocks of your interactive story. Each script file (.sfe) contains a standalone flowchart of nodes that represents a scene, chapter, or dialogue sequence. You can have as many script files as you need to organize your story.
To create a new script:
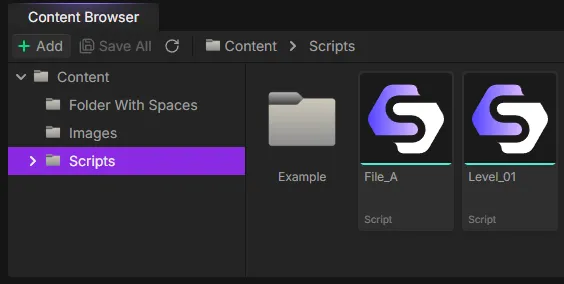
- In the Content Browser at the bottom of the editor, navigate to the folder where you want to create the script
- Either:
- Click the Add button (green plus icon) in the toolbar and select Script
- Or right-click on empty space in the folder view and select Script
- A new script file will appear - type a descriptive name (e.g., "Chapter_1", "Merchant_Dialogue", "Intro")
- Press Enter to confirm
Each new script starts with a single Start node. This is the entry point where the script begins when it's loaded. You can then add dialogue nodes, logic nodes, and other node types to build your story flow.
Tip: Organizing Scripts
content/:
- content/scripts/ - Main story scripts
- content/Dialogue/ - Reusable dialogue sequences
- content/Chapters/ - Individual chapters or acts
- content/Menus/ - Menu and UI flows
Setting Your Startup Script
The startup script is the first script that runs when the packaged game starts. For both templates it defaults to content/scripts/Script_Menu.sfe, but you can change it:
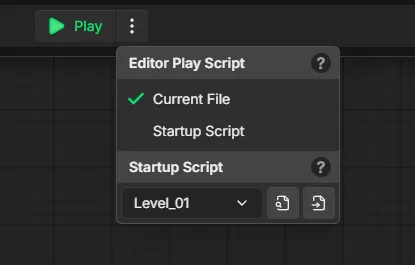
- Click the menu button () next to the Play button in the top toolbar
- Under "Startup Script" in the dropdown menu, select your desired script from the list
- The script is automatically saved as your project's startup script
The same dropdown also controls a few related settings:
- Editor Play Script — choose whether pressing Play in the editor runs the Current File you're editing or the project's Startup Script
- User Interface — pick the Default UI shown when you play
- All Project Settings — opens the full Project Settings window
Tip: Settings Live in Two Places
The Startup Script and Default UI can also be changed from Project Settings → General, which is the same window the All Project Settings link opens.
Setting Your Default UI
A User Interface file (.sfui) controls the on-screen layout shown while your story plays — things like where dialogue text and the character portrait appear. Your project's Default UI is the interface displayed when you play in the editor or export to HTML. The Example Project ships with a ready-made User_Interface.sfui set as its Default UI.
Change the Default UI from the same Play-menu dropdown (the User Interface selector) or from Project Settings → General.
Editing Project Name & Description
You enter a project's name and description when you create it, but you can change them later from Project Settings → General:
- Project Name — renaming here also renames the
.storyflowfile on disk - Project Description — the optional description shown in the projects list and Project Details
Project Icon & Hero Background
Two more visuals live in Project Settings → General:
- Project Icon: pick an image and crop it square in a dialog with mouse-wheel zoom. The icon is saved as
project-icon.pngin the project root, shown next to your project in the launcher and used as the app icon when you export a Desktop App. The minimum size is 32×32; 256×256 or larger is recommended. - Hero Background: pick an image and crop it to a wide 16:9. It is shown behind the project in the launcher. New projects start with a randomly picked scene from the bundled example art, so every project has a hero from day one. Replace it whenever you like.
Organizing Assets
While StoryFlow Editor is primarily focused on narrative flow and logic, you may want to include images or other assets in your project. The content folder is flexible - you can create any folder structure that makes sense for your project.
Example asset organization:
content/
├── scripts/             # Your story scripts
├── Images/              # Image assets
│   ├── Backgrounds/
│   ├── Characters/
│   └── UI/
└── Audio/               # Audio assets
Note: Asset Handling
StoryFlow Editor supports images (PNG, JPEG), audio (MP3, WAV), character files (.sfc), markdown files (.md), User Interface files (.sfui), and fonts (.ttf, .otf) alongside your scripts. Images can be used as dialogue backgrounds and character portraits, audio can be played during dialogue or via Play Audio nodes, and all assets are included in exports.
The Content Browser's Add (green +) menu creates Folder, Script, Character, Markdown, and User Interface files, and imports Image, Audio, and Font assets.
Audio Channels
Audio in StoryFlow plays through named audio channels. Each project has a managed list of between 1 and 8 channels, each with a name and a default volume, configured in Project Settings → Audio. Play Audio nodes target one of these channels.
Reserved filenames:
The following filenames are reserved and cannot be used for your scripts:
global-variables(any extension) - Reserved for the global variables systemproject(any extension) - Reserved for the project configuration systemcharacters(any extension) - Reserved for character data
These names collide with system-generated JSON files during export, so avoid using them for your script or asset files to prevent conflicts with StoryFlow Editor's internal systems. The check ignores the file extension and is case-insensitive.
Ready to Build!
Now that you understand project structure, dive into the Visual Scripting Overview to learn how to build your interactive stories using the visual scripting system.