Node Types Reference
StoryFlow Editor's visual scripting system provides over 80 specialized node types for creating complex interactive narratives without code.
Overview
Nodes are the building blocks of StoryFlow Editor's visual scripting system (also referred to as the node editor). Each node type represents a specific operation or action that can be combined to create complex branching narratives. Instead of writing code, you connect these nodes visually to define your story's logic and flow. All nodes are organized into four main categories, matching the node creation menu in the editor.
Node Categories
- Flow Control (11 nodes): Start, Dialogue, Run Script, Entry Flow, Run Flow, Play Audio, Set Background Image, Branch, Random Branch, End, Comment
- Boolean Operations (4 nodes): Not, And, Or, Equal
- Integer Operations (10 nodes): Comparisons (Greater Than, Greater Than or Equal, Less Than, Less Than or Equal, Equal) and Math (Plus, Minus, Multiply, Divide, Random)
- Float Operations (10 nodes): Comparisons (Greater Than, Greater Than or Equal, Less Than, Less Than or Equal, Equal) and Math (Plus, Minus, Multiply, Divide, Random)
- String Operations (6 nodes): Equal, Contains, Concatenate, Length, To Uppercase, To Lowercase
- Enum Operations (5 nodes): Equal Enum, Switch On Enum, Enum to String, String to Enum, Int to Enum
- Array Operations (10+ nodes): Add, Remove, Get Element, Set Element, Length, Clear, Contains, Find, Get Random, For Each Loop
- Type Conversion (10+ nodes): Convert between all types including Boolean, Integer, Float, String, and Enum
- Variables: Get and Set nodes for Boolean, Integer, Float, String, Enum, Image, Character, and Audio variables
- Character Variables (2 nodes): Get Character Variable, Set Character Variable
Visual Indicators:
- Yellow glow: Boolean operations and boolean variable nodes
- Cyan glow: Integer operations and integer variable nodes
- Lime green glow: Float operations and float variable nodes
- Pink/Magenta glow: String operations and string variable nodes
- Green glow: Start and Run Script nodes
- Red glow: End node
- Purple glow: Dialogue node
- White glow: Comment node
Alternative Color Scheme
StoryFlow Editor offers an alternative UE Style color scheme inspired by Unreal Engine's Blueprint colors. You can switch between color schemes in Settings → Variable Colors. This changes the colors for all variable-related nodes:
Default Colors:
UE Style Colors:
Flow Control
Control flow nodes determine how your story progresses from one point to another. They manage execution order, branching, dialogue presentation, and script organization.
Start
The Start node is the entry point for every script. When a script is executed, the runtime begins at the Start node and follows the connections to determine what happens next.
Key Features:
- Required: Every script must have exactly one Start node
- Fixed ID: Must have the ID "0" (enforced by validation)
- One Output: Has a single output handle on the right side
- Visual: Green glow effect to indicate it's the entry point
Important
Dialogue
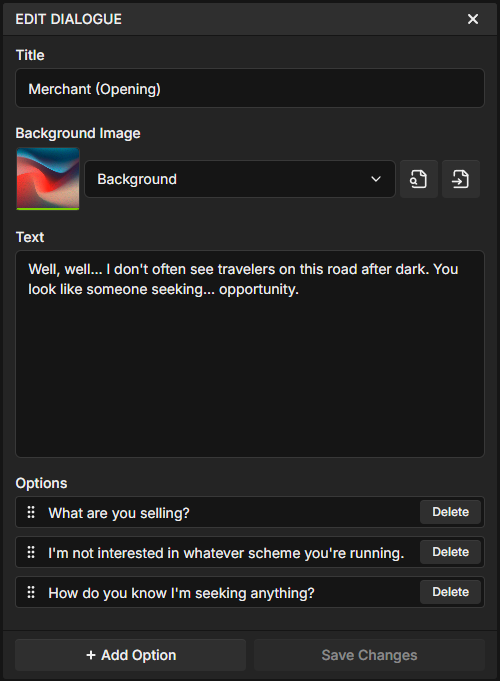
The Dialogue node is the heart of your interactive story. It displays text to the player, can show background images, and presents options that branch your narrative.
Properties:
- Title: Optional text shown in the editor node header for organization (not displayed to players)
- Text: Main dialogue content shown to the player
- Background Image: Optional image path for visual novels and illustrated stories
- Options: Clickable button choices the player can select (e.g., "Accept quest", "Decline quest")
- Elements: Interactive input fields (string, integer, float, boolean, or enum) that let players enter or select values
- Text Blocks: Non-interactive text displayed in the dialogue area, supporting variable interpolation and conditional visibility
Handles:
- Input (Top): Execution flow - connects from previous nodes
- Header Output (Top Right): Appears when the dialogue has no options or elements. Enables click-to-advance — at runtime, clicking anywhere advances to the connected node
- Condition (Left, per item): Optional boolean condition to show/hide the option, element, or text block
- On Click (Right, per option): Execution flow when the player selects a button option
- On Change (Right, per element): Execution flow when an element's input value changes
- Value (Right, per element): Typed output for the element's current input value
Use Cases:
- Display narrative text and character dialogue
- Present branching options to players
- Show images for visual novels
- Create conditional dialogue options based on variables
- Click-to-advance narration without buttons
Tip
Double-click a Dialogue node to open the Dialogue Editor in the right sidebar. This provides a dedicated interface for editing all dialogue properties including text, options, and background images. Learn more about the Dialogue Editor →
Run Script
The Run Script node loads and executes another .sfe script file. This enables modular story organization by splitting your narrative across multiple files.
Properties:
- Script Path: Select a
.sfefile from your project's Content folder - Searchable Dropdown: Quickly find scripts by typing their name
- Quick Actions: Show in Content Browser or Open File buttons for easy navigation
Handles:
- Execution Input (Top Left): Execution flow from previous node
- Default Output (Top Right): Continues execution after the called script completes (when no exit route is used)
- Input Parameters (Left): Typed handles for passing values into the called script. Appear automatically based on variables marked as "Input" in the target script
- Output Variables (Right): Typed handles for reading values from the called script after it returns. Appear automatically based on variables marked as "Output" in the target script
- Exit Routes (Right): Execution flow handles that appear for each flow marked as "Exit Route" in the target script. Allows routing based on how the called script ended
Use Cases:
- Organize large stories into chapters or scenes
- Reuse common dialogue sequences across multiple stories
- Create modular narrative components
- Separate main menu, settings, and gameplay flows
- Pass data between scripts via input parameters and output variables
- Handle multiple script outcomes with exit routes
Script Interface
Run Script nodes automatically discover the target script's interface. To expose variables and flows as interface elements in the target script:
- Input Parameters: Edit a variable and enable the "Input" toggle to make it available as an input handle on calling Run Script nodes.
- Output Variables: Enable the "Output" toggle on a variable to make its final value readable after the script returns.
- Exit Routes: In the Flows panel, mark a flow as "Exit Route" to create an exit handle on calling Run Script nodes. When the script ends through that flow, execution follows the corresponding exit handle.
Entry Flow
The Entry Flow node marks the starting point of a reusable flow within the same script file. Flows let you organize complex logic into named, reusable sections.
Properties:
- Flow Name: Displayed in the node header and the Flows panel
- Visual Style: Green glow similar to Start and Run Script nodes
Handles:
- Output (Right): Execution flow - connect to the first node in your flow logic
Use Cases:
- Create reusable logic sequences within a single script
- Organize complex scripts into named sections
- Define shared behavior called from multiple places
Flows vs Run Script
Use Entry Flow for subflows within the same file. Use Run Script to call different .sfe files. Learn more about Flows →
Run Flow
The Run Flow node calls a flow defined in the current script. Execution jumps to the selected Entry Flow node and returns when the flow completes.
Properties:
- Flow Selector: Dropdown to choose which flow to call
- Searchable: Type to filter flows by name
- Visual Style: Green glow matching other flow control nodes
Handles:
- Input (Left): Execution flow from previous node
- Output (Right): Continues execution after the flow completes
Use Cases:
- Call shared logic from multiple places in your script
- Keep your main story flow clean while delegating complex checks
- Reuse inventory checks, stat updates, or common dialogues
Play Audio
The Play Audio node triggers audio playback during story execution. Use it for background music, sound effects, ambient sounds, and audio cues that aren't tied to dialogue.
Properties:
- Audio File: Select MP3 or WAV file from your project's Content folder
- Loop: Enable to continuously repeat the audio (great for background music)
- Searchable Dropdown: Quickly find audio files by typing their name
- In-Editor Preview: Play/stop button to preview audio without running your story
- Quick Actions: Show in Content Browser or Open File buttons
Handles:
- Input (Left): Execution flow from previous node
- Output (Right): Continues execution immediately (audio plays in parallel)
Use Cases:
- Play background music that loops throughout a scene
- Trigger one-shot sound effects (door opening, footsteps)
- Set ambient sounds for atmosphere (forest sounds, rain)
- Play audio cues at key story moments
Set Background Image
The Set Background Image node changes the runtime's background image at any point in your story. Unlike dialogue node backgrounds which only display during that dialogue, this node sets a persistent background.
Properties:
- Image File: Select an image file from your project's Content folder
- Searchable Dropdown: Quickly find images by typing their name
- Image Preview: Shows selected image in the node
- Quick Actions: Show in Content Browser or Open File buttons
Handles:
- Input (Left): Execution flow from previous node
- Output (Right): Continues execution after setting background
Use Cases:
- Change scene locations (forest → castle → dungeon)
- Update backgrounds based on time of day
- Show visual changes from story events
- Set backgrounds that persist across multiple dialogues
Branch
The Branch node creates conditional logic in your story. It evaluates a boolean condition and routes execution to either the True or False output path.
Inputs:
- Execution Input (Top Left): Incoming execution flow
- Condition Input (Bottom Left): Boolean value to evaluate (can connect a boolean handle or use the checkbox)
Outputs:
- True Output (Top Right): Execution continues here if condition is true
- False Output (Bottom Right): Execution continues here if condition is false
Use Cases:
- Check if the player has a specific item (boolean variable)
- Route to different dialogue based on previous options
- Combine multiple boolean conditions with And/Or nodes
- Create conditional story paths based on stats
Note
Random Branch
The Random Branch node randomly selects one of multiple output paths at runtime, with support for weighted probability. Use it to add randomness and variety to your stories.
Properties:
- Outputs: Two or more output paths (starts with 2, add more with the "Add Output" button)
- Weights: Each output has an integer weight (minimum 1) controlling its probability of being chosen. Weights can also be connected to integer variable nodes for dynamic control
- Add/Remove: Add new outputs or remove existing ones (minimum 2 required)
Handles:
- Input (Left): Execution flow from previous node
- Outputs (Right): Multiple numbered execution outputs (#1, #2, #3, etc.) — one is randomly chosen each time
- Weight Inputs (Left, per output): Optional integer handles to set weights dynamically from variables
Weighted Probability:
Weights determine how likely each output is to be selected. For example, if output #1 has weight 3 and output #2 has weight 1, output #1 will be selected approximately 75% of the time and output #2 approximately 25% of the time. Equal weights give each output an equal chance.
Use Cases:
- Random encounters with weighted rarity
- Random dialogue variations for replay variety
- Loot drops with different probability tiers
- Chance-based story events
End
The End node terminates the current script execution. When the runtime reaches an End node, the story flow stops at that point.
Features:
- Single Input: Accepts execution flow from previous nodes
- No Outputs: Terminates the execution path
- Visual: Red glow effect to clearly mark endpoints
Use Cases:
- Mark the end of a conversation or story branch
- Terminate execution after final dialogue
- Create dead-end paths in your narrative
- Define completion points for side quests or encounters
Comment
The Comment node is a special node for adding text annotations to your node graph. It doesn't participate in execution and is purely for documentation purposes.
Features:
- Resizable: Drag the resize handles to adjust width and height (minimum 150x80 pixels)
- Multiline Text: Add detailed notes and explanations
- No Handles: Cannot be connected to other nodes
- Visual: White glow effect to distinguish from execution nodes
Use Cases:
- Document complex logic sections
- Leave notes for collaborators
- Annotate and organize large node graphs
- Add TODOs and reminders for future work
Boolean Operations
Boolean operation nodes perform logical operations on true/false values. They're essential for creating complex conditional logic by combining multiple boolean conditions. All boolean nodes have a yellow glow to indicate they work with boolean values.
Not
The NOT node inverts a boolean value without changing the original: outputs false when input is true, outputs true when input is false.
Key Features:
- Single Input: Boolean value on the left side
- Single Output: Inverted boolean value on the right side (does not modify the input)
- Use Case: Check if a condition is false (e.g., player does NOT have key)
And
The AND node returns true only if BOTH inputs are true.
Key Features:
- Two Inputs: Boolean values on the left side (top and bottom)
- Single Output: True only if both inputs are true
- Use Case: Check multiple requirements (e.g., Boolean hasKey AND Boolean hasMap )
- Default Values: Checkboxes appear when inputs aren't connected
Or
The OR node returns true if ANY input is true.
Key Features:
- Two Inputs: Boolean values on the left side (top and bottom)
- Single Output: True if at least one input is true
- Use Case: Check alternative conditions (e.g., Boolean hasKey OR Boolean knowsPassword )
- Default Values: Checkboxes appear when inputs aren't connected
Equal
The Equal (Boolean) node returns true if both boolean inputs have the same value.
Key Features:
- Two Inputs: Boolean values on the left side (top and bottom)
- Single Output: True if both inputs match (both true OR both false)
- Use Case: Compare two boolean states (e.g., check if choice1 equals choice2)
- Default Values: Checkboxes appear when inputs aren't connected
Integer Operations
Integer operation nodes perform comparisons and arithmetic on whole numbers. All integer nodes have a cyan glow to indicate they work with numeric values.
Greater Than
Returns true if the top input is greater than the bottom input.
- Example: 10 > 5 = true
- Use Case: Check if Integer playerHealth > 0 (player is alive)
Greater Than or Equal
Returns true if the top input is greater than or equal to the bottom input.
- Example: 10 >= 10 = true
- Use Case: Check if Integer score >= 100 (unlock achievement)
Less Than
Returns true if the top input is less than the bottom input.
- Example: 5 < 10 = true
- Use Case: Check if Integer gold < Integer itemPrice (cannot afford)
Less Than or Equal
Returns true if the top input is less than or equal to the bottom input.
- Example: 10 <= 10 = true
- Use Case: Check if Integer level <= Integer maxLevel (hasn't exceeded cap)
Equal
Returns true if both integer inputs are exactly equal.
- Example: 10 == 10 = true
- Use Case: Check if Integer level == Integer requiredLevel (exact match)
Plus
The Plus node adds two integers together (top + bottom).
- Two Inputs: Top and bottom integer inputs (cyan handles)
- Integer Output: Cyan handle outputs the sum
- Use Case: Add gold reward to Integer playerGold 's total
Minus
The Minus node subtracts the bottom input from the top input (top - bottom).
- Two Inputs: Top and bottom integer inputs (cyan handles)
- Integer Output: Cyan handle outputs the difference
- Use Case: Deduct item cost from Integer playerGold
Multiply
The Multiply node multiplies two integers together (top × bottom).
- Two Inputs: Top and bottom integer inputs (cyan handles)
- Integer Output: Cyan handle outputs the product
- Use Case: Calculate total damage (base damage × multiplier)
Divide
The Divide node divides the top input by the bottom input (top ÷ bottom). Result is rounded down to the nearest integer.
- Two Inputs: Top and bottom integer inputs (cyan handles)
- Integer Output: Cyan handle outputs the quotient (integer division)
- Use Case: Calculate items per player in party
- Safety: Division by zero returns 0 to prevent errors
Random
The Random node generates a random integer between two values (inclusive).
- Two Inputs: Top input (from/min) and bottom input (to/max) (cyan handles)
- Integer Output: Cyan handle outputs a random number within the range
- Use Case: Random dice rolls, loot generation, chance-based events
- Example: Inputs 1 and 6 produces random numbers like a six-sided die
Common Features (All Integer Operation Nodes):
- Cyan Glow: All integer operation nodes use cyan coloring
- Number Fields: When inputs aren't connected, number fields appear for manual values
- Negative Support: All nodes support negative integers
- Type Safety: Can only connect to other integer handles (except comparison outputs which are boolean)
Float Operations
Float operation nodes work with decimal numbers (floating-point values). They provide the same comparisons and arithmetic as integer nodes but support fractional values. All float nodes have a lime green glow.
Available Float Operations:
- Comparisons: Greater Than, Greater Than or Equal, Less Than, Less Than or Equal, Equal (all output boolean)
- Arithmetic: Plus, Minus, Multiply, Divide, Random (all output float)
Key Differences from Integers:
- Precision: Can store decimal values like 3.14, 0.5, -2.7
- Division: Float division produces exact decimal results (not rounded)
- Use Cases: Percentages, ratios, timers, physics calculations, health regeneration rates
- Example Values: 100.5 health, 0.85 speed multiplier, 2.5 damage bonus
When to Use Floats vs Integers
Use integers for discrete counts and whole numbers (items, levels, gold coins).
Use floats for continuous values and percentages (health %, speed multiplier, accuracy rating).
String Operations
String operation nodes work with text values. They enable text manipulation, comparison, and dynamic string building. All string nodes have a pink/magenta glow.
Equal (String)
Returns true if two strings are exactly the same (case-sensitive).
- Two Inputs: String values to compare (pink handles)
- Boolean Output: Yellow handle outputs true if strings match
- Use Case: Check if player entered correct password or code word
Contains
Returns true if the first string contains the second string as a substring.
- Two Inputs: Haystack (string to search in) and needle (string to find) (pink handles)
- Boolean Output: Yellow handle outputs true if found
- Use Case: Check if player's name contains certain letters
Concatenate
Combines two strings into one (joins them together).
- Two Inputs: First string and second string (pink handles)
- String Output: Pink handle outputs combined text
- Use Case: Build full names from first + last, create custom messages
- Example: "Hello " + "World" = "Hello World"
Length
Returns the number of characters in a string.
- Input: String to measure (pink handle)
- Integer Output: Cyan handle outputs character count
- Use Case: Validate password length, limit player name length
To Uppercase
Converts all letters in a string to uppercase.
- Input: String to convert (pink handle)
- String Output: Pink handle outputs uppercase version
- Use Case: Format titles, normalize input for comparison
- Example: "hello" → "HELLO"
To Lowercase
Converts all letters in a string to lowercase.
- Input: String to convert (pink handle)
- String Output: Pink handle outputs lowercase version
- Use Case: Case-insensitive password checking
- Example: "HELLO" → "hello"
Enum Operations
Enum operation nodes work with enum (enumeration) variables - custom types with a defined set of named values. All enum nodes have a teal glow.
Equal Enum
Compares two enum values and returns true if they match.
- Two Inputs: Enum values to compare (teal handles, both must be the same enum type)
- Boolean Output: Yellow handle outputs true if both values are the same option
- Use Case: Check if player's current state matches a specific state
Switch On Enum
Routes execution based on an enum value. Creates one output handle for each option in the enum - similar to a switch statement in programming.
- Execution Input (Left): When to evaluate the switch
- Enum Input: The enum value to switch on (teal handle)
- Multiple Outputs (Right): One execution output per enum option, labeled with option names
- Use Case: Branch based on difficulty setting, character class, or game state
Dynamic Outputs
The Switch On Enum node automatically updates its output handles when you change the enum variable. If your enum has options "Easy", "Normal", "Hard", you'll see three labeled outputs to connect different story branches.
Enum Conversion Nodes
These nodes convert between enum values and other types:
- Enum to String: Convert enum value to its text name (e.g., Difficulty.Hard → "Hard")
- String to Enum: Convert text to enum value (e.g., "Hard" → Difficulty.Hard)
- Int to Enum: Convert integer index to enum value (e.g., 2 → Difficulty.Hard, where 0=Easy, 1=Normal, 2=Hard)
Array Operations
Array operation nodes let you work with lists of values. You can create arrays of most types (boolean, integer, float, string, image, character, audio) and manipulate them with these nodes. Array nodes are color-coded to match the type of array they work with. Note: Enum arrays are not currently supported.
Array Node Variants
Each array operation has variants for different types. For example, you'll find "Add to Integer Array", "Add to String Array", "Add to Boolean Array", etc. in the node creation menu. The nodes work the same way but are type-specific.
Add to Array
Appends a value to the end of an array, increasing its length by one.
- Execution Input (Left): When to add the item
- Execution Output (Right): Continues after adding
- Array Selector: Choose which array variable to modify
- Value Input: The item to add (type matches array type)
- Use Case: Add items to inventory, record visited locations, track dialogue history
Remove from Array
Removes an item from the array. Can remove by value (first matching item) or by index.
- Execution Input (Left): When to remove the item
- Execution Output (Right): Continues after removing
- Array Selector: Choose which array variable to modify
- Value/Index Input: What to remove
- Use Case: Remove items from inventory, delete completed quest objectives
Get Array Element
Retrieves an item at a specific index in the array. Does not modify the array.
- Array Selector: Choose which array variable to read
- Index Input: Position to read (cyan integer handle, 0-based)
- Value Output: The item at that index (type matches array type)
- Use Case: Get specific inventory slot, access party member by position
Index Bounds
Array indices start at 0. An array with 3 items has valid indices 0, 1, and 2. Accessing an index outside this range may return a default value or cause unexpected behavior.
Set Array Element
Changes an item at a specific index in the array without changing the array's length.
- Execution Input (Left): When to set the value
- Execution Output (Right): Continues after setting
- Array Selector: Choose which array variable to modify
- Index Input: Position to change (cyan integer handle, 0-based)
- Value Input: The new value (type matches array type)
- Use Case: Update inventory slot, swap party member, change equipment
Array Length
Returns the number of items currently in an array.
- Array Selector: Choose which array variable to measure
- Integer Output: Cyan handle outputs the count
- Use Case: Check inventory size, validate array bounds, count quest objectives
Clear Array
Removes all items from an array, resetting it to empty (length 0).
- Execution Input (Left): When to clear
- Execution Output (Right): Continues after clearing
- Array Selector: Choose which array variable to clear
- Use Case: Reset inventory, clear temporary lists, start fresh
Array Contains
Checks if an array contains a specific value. Returns a boolean result.
- Array Selector: Choose which array variable to search
- Value Input: The item to find (type matches array type)
- Boolean Output: Yellow handle outputs true if found, false otherwise
- Use Case: Check if player has a specific item, verify visited location, check unlocked achievements
Find in Array
Returns the index position of a value in the array, or -1 if not found.
- Array Selector: Choose which array variable to search
- Value Input: The item to find (type matches array type)
- Integer Output: Cyan handle outputs index (0-based) or -1 if not found
- Use Case: Get position of item in inventory, find party member index
Get Random Element
Retrieves a random item from the array. Each call may return a different item.
- Array Selector: Choose which array variable to pick from
- Value Output: A random item from the array (type matches array type)
- Use Case: Random loot drops, random dialogue variations, shuffle effects, random encounters
For Each Loop
Iterates over all items in an array, executing connected nodes once for each element. This is the most powerful array node for processing collections.
- Execution Input (Left): When to start the loop
- Array Selector: Choose which array variable to iterate over
- Loop Body Output: Executes once for each element in the array
- Current Item Output: The current element being processed (type matches array type)
- Current Index Output: Cyan integer handle with the current index
- Completed Output: Executes once after all elements have been processed
Use Cases:
- Process all inventory items (display, sell, discard)
- Apply effects to all party members
- Check all quest objectives for completion
- Display all dialogue options from an array
- Calculate totals across array items
For Each Flow
The Loop Body output runs once per item, then the Completed output runs once at the end. Connect your per-item logic to Loop Body, and any follow-up logic to Completed. Use the Current Item and Current Index outputs to access the current element during each iteration.
Type Conversion
Type conversion nodes convert values between different data types. This enables mixing different variable types in your logic. Conversion nodes have no glow (neutral gray).
Available Conversions:
- Boolean ↔ Integer: true = 1, false = 0
- Boolean ↔ Float: true = 1.0, false = 0.0
- Integer ↔ Float: Add/remove decimal point (5 ↔ 5.0)
- Integer ↔ String: Number to text and back (42 ↔ "42")
- Float ↔ String: Decimal to text and back (3.14 ↔ "3.14")
Common Use Cases:
- Display Numbers: Convert integer score to string for dialogue text
- Math with Booleans: Convert boolean flags to numbers for calculations
- Precision Control: Convert float to integer to round values
- Parse Input: Convert player's text input into numbers
Conversion Notes
- Float to Integer: Rounds down (3.9 becomes 3)
- String to Number: Invalid strings (like "abc") become 0
- Non-zero to Boolean: Any non-zero number becomes true
Variables
Variable nodes allow you to read (Get) and write (Set) values to variables of all types: Boolean, Integer, Float, String, Enum, and asset types (Image, Character, Audio). Variables store state information that persists throughout your story.
Get Boolean
Read a boolean variable's current value. Boolean variables store true/false values that represent flags, states, and binary choices. Examples: hasCompletedQuest, playerIsAlive, doorIsOpen, talkedToMerchant.
Key Features:
- Output: Single boolean handle (yellow) on the right side
- Display: Shows the variable name in the node
- Global Indicator: Shows globe icon if accessing a global variable
- Use Case: Check if player has an item, quest is completed, or door is unlocked
Set Boolean
Change a boolean variable's value during story execution.
Key Features:
- Inputs: Execution flow (top left), boolean value to set (bottom left)
- Outputs: Execution flow continues (top right), current value pass-through (bottom right)
- Default Value: Checkbox appears when value input is not connected
- Use Case: Mark quest as completed, unlock door, or set player state
Get Integer
Read an integer variable's current value. Integer variables store whole numbers for stats, counters, scores, and quantities. Examples: Integer playerHealth , Integer goldAmount , Integer questProgress , Integer enemyCount .
Key Features:
- Output: Single integer handle (cyan) on the right side
- Display: Shows the variable name in the node
- Global Indicator: Shows globe icon if accessing a global variable
- Use Case: Get Integer playerHealth , Integer goldAmount , or Integer questProgress for comparisons
Set Integer
Change an integer variable's value during story execution.
Key Features:
- Inputs: Execution flow (top left), integer value to set (bottom left)
- Outputs: Execution flow continues (top right), current value pass-through (bottom right)
- Default Value: Number input field appears when value input is not connected
- Validation: Automatically removes leading zeros from input
- Use Case: Update Integer playerHealth , add Integer playerGold , or increment Integer questProgress
Get Float
Read a float variable's current value. Float variables store decimal numbers for percentages, ratios, and precise calculations.
Key Features:
- Output: Single float handle (lime green) on the right side
- Display: Shows the variable name in the node
- Global Indicator: Shows globe icon if accessing a global variable
- Use Case: Get speed multiplier, damage bonus, or health percentage
Set Float
Change a float variable's value during story execution.
Key Features:
- Inputs: Execution flow (top left), float value to set (bottom left)
- Outputs: Execution flow continues (top right), current value pass-through (bottom right)
- Default Value: Number input field appears when value input is not connected
- Use Case: Set speed multiplier, update damage bonus percentage
Get String
Read a string variable's current value. String variables store text like player names, locations, and custom messages.
Key Features:
- Output: Single string handle (pink) on the right side
- Display: Shows the variable name in the node
- Global Indicator: Shows globe icon if accessing a global variable
- Use Case: Get player name, location name, or custom dialogue
Set String
Change a string variable's value during story execution.
Key Features:
- Inputs: Execution flow (top left), string value to set (bottom left)
- Outputs: Execution flow continues (top right), current value pass-through (bottom right)
- Default Value: Text input field appears when value input is not connected
- Use Case: Store player name, save location, record choice text
Enum Variables
Enum variables use a custom type with predefined options. Get and Set nodes for enums work similarly to other variable types but with dropdown selectors for the enum options.
Get Enum
- Output: Single enum handle (teal) on the right side
- Display: Shows variable name and current value
- Use Case: Read current difficulty, player state, or faction
Set Enum
- Inputs: Execution flow, enum value from dropdown or connected node
- Outputs: Execution flow continues, value pass-through
- Value Selector: Dropdown shows all options defined in the enum
- Use Case: Change difficulty, update player state, set faction
Asset Variables
Asset variables store references to project files. They have dedicated file selectors with thumbnails and previews.
Image Variables (Get/Set Image)
- Type: References image files in your Content folder
- Selector: Visual browser with image thumbnails
- Handle Color: Emerald/green
- Use Case: Dynamic backgrounds, character portraits, UI images
Character Variables (Get/Set Character)
- Type: References character files (.sfc) in your project
- Selector: Dropdown with character portraits
- Handle Color: Purple
- Use Case: Dynamic speaker selection, party member tracking
Audio Variables (Get/Set Audio)
- Type: References audio files (MP3, WAV) in your Content folder
- Selector: Audio file browser with preview playback
- Handle Color: Amber/orange
- Use Case: Dynamic music, sound effect selection, voice lines
Asset Variables vs Direct Selection
Asset variables let you dynamically change which file is used at runtime. Instead of hardcoding a specific image in a node, you can set the image variable based on game state, then use that variable wherever the image is needed.
Get Character Variable
The Get Character Variable node reads variables from character files (.sfc). Characters can have custom variables (health, affection, mood, etc.) that you can read with this node.
Properties:
- Character Selector: Choose a character from your project's .sfc files
- Variable Selector: Choose which variable to read from that character
- Character Preview: Shows the character's portrait image
- Dynamic Output Type: Output handle color changes based on variable type (boolean, integer, float, string, enum, array)
Handles:
- Output (Right): Value of the selected character variable (type depends on variable)
Built-in Fields:
- Name: The character's display name (string)
- Image: The character's portrait image (image type)
Use Cases:
- Check a character's affection level for relationship-based branching
- Read character health or stats for RPG mechanics
- Get character mood for dynamic dialogue
- Access character-specific flags and states
- Retrieve the character's portrait image for dynamic UI
Tip
Character variables are defined in character files (.sfc) which you can create and edit in the Content Browser. Each character can have multiple variables of any type, including arrays.
Set Character Variable
The Set Character Variable node modifies variables in character files (.sfc) during story execution. Use it to update character stats, flags, and properties based on player choices and story events.
Properties:
- Character Selector: Choose a character from your project's .sfc files
- Variable Selector: Choose which variable to modify on that character
- Character Preview: Shows the character's portrait image
- Value Input: Set the new value directly or connect from another node
- Dynamic Type: Input/output handles adapt to the selected variable type
Handles:
- Input (Top Left): Execution flow from previous node
- Output (Top Right): Execution flow to next node
- Value Input (Bottom Left): Accepts value from connected node (type matches variable)
- Value Output (Bottom Right): Outputs the new value after setting (for chaining)
Use Cases:
- Increase a character's affection level after a positive interaction
- Update character health or stats during gameplay
- Set character mood flags based on dialogue choices
- Change a character's name dynamically during the story
- Track relationship progress with multiple characters
Tip: Character Name
You can also modify the built-in Name property of a character using this node, allowing you to dynamically change character names during gameplay.
Creating Variable Nodes
- Drag from Variables Panel: Drag a variable onto the canvas and choose Get or Set
- Context Menu: Right-click and find the variable under the Variables section
Variable Scopes:
- Local Variables: Exist only within the current script file
- Global Variables: Persist across all scripts in your project (marked with globe icon)
Example: Adding Gold
- Create a Get Integer node for "playerGold" variable
- Create a Plus node
- Connect Get node to Plus node's top input
- Set Plus node's bottom input to 50 (or connect another Get node)
- Create a Set Integer node for "playerGold"
- Connect Plus node's output to Set node's value input
Connection Types
StoryFlow Editor enforces strict type safety for connections. Handles can only connect to compatible handles, preventing logic errors.
Primary Handles (Execution Flow):
- Appearance: Play icon (triangle), white color
- Purpose: Define the order in which nodes execute
- Rules: Can only connect to other primary handles
- Used By: Start, End, Dialogue, Run Script, Branch, Set nodes
Boolean Handles (Yellow):
- Appearance: Yellow circle with play icon overlay
- Purpose: Pass true/false values between nodes
- Rules: Can only connect to other boolean handles
- Used By: Boolean Get/Set, logic nodes (And, Or, Not, Equal), comparison nodes, Branch condition input
Integer Handles (Cyan):
- Appearance: Cyan circle with play icon overlay
- Purpose: Pass whole number values between nodes
- Rules: Can only connect to other integer handles
- Used By: Integer Get/Set, arithmetic nodes (Plus, Minus, Multiply, Divide, Random), comparison nodes
Float Handles (Lime Green):
- Appearance: Lime green circle with play icon overlay
- Purpose: Pass decimal number values between nodes
- Rules: Can only connect to other float handles
- Used By: Float Get/Set, float arithmetic nodes, float comparison nodes
String Handles (Pink/Magenta):
- Appearance: Pink/Magenta circle with play icon overlay
- Purpose: Pass text values between nodes
- Rules: Can only connect to other string handles
- Used By: String Get/Set, string operation nodes (Concatenate, Contains, etc.)
Connection Validation
The editor prevents invalid connections automatically. You cannot connect handles of different types (boolean to integer, float to string, etc.), a node to itself, or exceed maximum connection limits. This type safety ensures your story logic is always valid. Use type conversion nodes when you need to convert between different data types.
Next Steps
Now that you understand the node types, learn how to work with variables to create dynamic, state-driven narratives, explore Flows for organizing complex scripts, or see how to export your stories as playable HTML games.