
How to Build a Visual Novel Without Code: The 2026 Guide
You can build a complete visual novel without writing a single line of code using a no-code editor: Ren'Py (free, open-source), TyranoBuilder ($14.99), Naninovel ($150 Unity asset) or StoryFlow Editor ($30). The fastest fully no-code path is a 7-step workflow in a node-based or drag-and-drop tool: create a project, add a character, write a dialogue line, add choices, track a variable, branch on it, then export to a playable HTML file. You can have a branching scene running in about 30 minutes. The catch worth knowing up front: only some of these tools are truly code-free, which is what this guide untangles.
Key Takeaways
- "No code" is not universal. Ren'Py and TyranoBuilder still drop you into a scripting language for real logic. Node-based editors like StoryFlow Editor keep branching fully visual.
- Every visual novel is six building blocks: scenes, characters, dialogue, choices, variables and branching. Master those and the tool barely matters.
- The cheapest serious tools are $0–$30. Ren'Py is free (MIT), TyranoBuilder is $14.99, StoryFlow Editor is $30 once, Naninovel is $150 on the Unity Asset Store.
- Ownership comes from open export. Tools that export HTML or JSON let you start on itch.io and port to Unity, Unreal or Godot for a Steam release.
- You can build a working branching scene in ~30 minutes by following the 7 steps below.
You want to make a visual novel. You've played Doki Doki Literature Club — which sold over two million downloads within four months of its 2017 release (Wikipedia) — maybe Slay the Princess or Scarlet Hollow, and somewhere along the way the thought crept in: I could write one of these.
Then you opened Ren'Py's docs.
Here's the problem nobody warns you about. Several tools sold as "beginner-friendly" still expect you to write code. Ren'Py has its own scripting language. Naninovel lives inside Unity and exposes a C# API for anything custom. Even drag-and-drop builders like TyranoBuilder hit a wall the second you need real conditional logic, and at that point they hand you a script editor.
This post is a practical walkthrough of what a visual novel actually needs, a hands-on tutorial you can follow today and an evidence-based rundown of the tools that let you build one without programming. If you can write a story, you can ship a visual novel in 2026. You don't need to touch a line of code to do it.

What Is a Visual Novel, Really?
Before picking a tool it helps to know what you're actually making. A visual novel is a text-driven interactive story where the player reads dialogue, occasionally picks a choice and watches the narrative branch from that choice. The art and music set the mood. The writing does the work.
Strip any visual novel down to its fundamentals and you'll find the same ingredients:
- Scenes. A backdrop image with optional background music or ambient sound.
- Characters. A display name and a portrait, usually with a few alternate expressions.
- Dialogue lines. Text that appears in a box, spoken by a character.
- Choices. Options the player picks to advance the story.
- Variables. Hidden values that remember what the player did. Was rude to Alice. Gave the locket to Bob. Chose violence in Chapter 2.
- Branching. Different paths through the story based on those variables.
That's it. Steins;Gate is built from those six pieces. So is a game jam entry you finish next weekend. Any tool that lets you compose those six things without writing code is a legitimate visual novel maker.
Why "No Code" Is Harder Than It Sounds
"No code" has become marketing fluff. Most tools sold as no-code visual novel makers fall into one of three traps.
1. Scripting languages pretending to be "simple syntax." Ren'Py is the classic case. It is free and
open-source under the MIT license (Wikipedia),
the syntax is friendlier than raw Python, but you still end up writing jump, if and
label statements in a text file. If you don't speak programming, a bug at midnight means you're debugging code
whether you wanted to or not.
2. Rigid drag-and-drop builders. TyranoBuilder ($14.99 on Steam) and its cousins let you assemble scenes from pre-made blocks. That works fine for linear stories. The moment you want "if the player has been rude three times, Alice refuses to open the door," you reach for TyranoScript, its built-in scripting language — coding by another name.
3. AI-first generators. A new crop of tools will produce a whole visual novel from a text prompt. Fun for prototyping. Useless if you want to actually control your story. Most creators want to write their narrative, not describe it to a model and hope for the best.
The approach that holds up under real projects is visual scripting. You work on a canvas where each dialogue, choice and branch is a node. Logic is expressed by connecting nodes together. It's the same idea Unreal Engine uses for Blueprints and Blender uses for shaders. You get the power of code without the syntax.

The Six Building Blocks in Practice
Regardless of which tool you settle on, you'll spend most of your time working with the same six ingredients. Here's what to actually look for in each.
1. Scenes and Backgrounds
A scene is the background the player is looking at right now. You need an image (bedroom, forest clearing, spaceship bridge)
and usually a music track. Most tools let you attach a background and an audio file to a dialogue node or scene block. The
only real skill here is naming. Use location names like forest_night or tavern_day and reuse them.
Your final game will have far fewer backgrounds than you expect, because reused backgrounds make a visual novel feel
deliberate rather than cheap.
2. Characters
A character is a bundle of data. A display name. A default portrait. A few alternates for different emotions. The thing to check before committing to a tool is whether characters are first-class objects. You want to edit a character's name once and see it change everywhere. If your tool makes you hardcode names inside dialogue lines, every typo fix becomes a find-and-replace chore.
Portrait art used to be the hardest part of visual novel development. In 2026 you have options. Commission from Skeb or Fiverr if you can afford it. Use CC0 asset packs from itch.io if you can't. Generate placeholders with AI while you iterate on the story, then replace them with real art when you know the characters stick.
3. Dialogue Lines
A dialogue line is just a character saying a thing. What matters is how flexible that "thing" can be. Can you embed variables
in the text, so you can write "Nice to meet you, {playerName}"? Can you attach voice-over audio per line? Can
you override the portrait for one specific line when the character raises an eyebrow? These are small features that add up fast
once your story has weight.
4. Choices
When the player hits a choice the story branches. Most tools let you attach two to five options to a dialogue node. Each option becomes its own connection you can wire to a follow-up scene. Two features matter more than anything else here.
- Conditional visibility. Show "Ask about the locket" only if the player has actually seen the locket.
- Once-only options. The player shouldn't be able to say "Who are you?" to the same character three times in a row.
If a tool can't do conditional choices you'll feel the pain inside a week. The workaround (hiding options behind entirely separate scenes) turns into a maintenance nightmare once you've got a few dozen nodes.
5. Variables
Variables are the memory of your story. When the player gives Alice the locket you set gaveLocketToAlice = true.
Three chapters later Alice's dialogue can check that variable and either thank the player or accuse them of stealing it.
Without variables your branching is local only. Choice A leads to scene B and the story can't remember anything outside the
current conversation.
At minimum you want booleans for true/false flags, integers for things like gold or affection scores and strings for custom input like the name the player typed. Arrays and enums are nice once the project grows but you can ship a first VN without them.
6. Branching
Branching is where variables meet story. A branch node checks a condition (if gaveLocketToAlice == true) and
routes the dialogue down one of two paths. In a decent tool a branch is just another node on the canvas. Input comes in the
top, the condition is checked, one of the outputs fires.
If you've read our deep dive on why first dialogue systems always fail, you already know this is the piece that breaks hand-rolled implementations. A visual tool prevents the nested if/else hell before it has a chance to start.
Build a Visual Novel Scene in 30 Minutes
Enough theory. Let's actually build something.
We'll use StoryFlow Editor ($30, 80+ node types, no code) for this walkthrough because it's node-based, runs on Windows, macOS and Linux and doesn't make you write any code. The concepts transfer to any visual scripting tool though. If you want to follow along, grab the editor from Steam or itch.io.
Step 1: Create a New Project
Launch the editor. Click "New Project", name it, pick a folder. When the project opens you'll see an infinite canvas with a single Start node. Everything in your story hangs off that one point.
Step 2: Add Your First Character
Open the character browser and add a new character. Give them a display name like Aldric, drop in a portrait
and save. If the tool supports it, add at least a neutral portrait and a happy variant so you can change expressions later.
Step 3: Write the Opening Dialogue
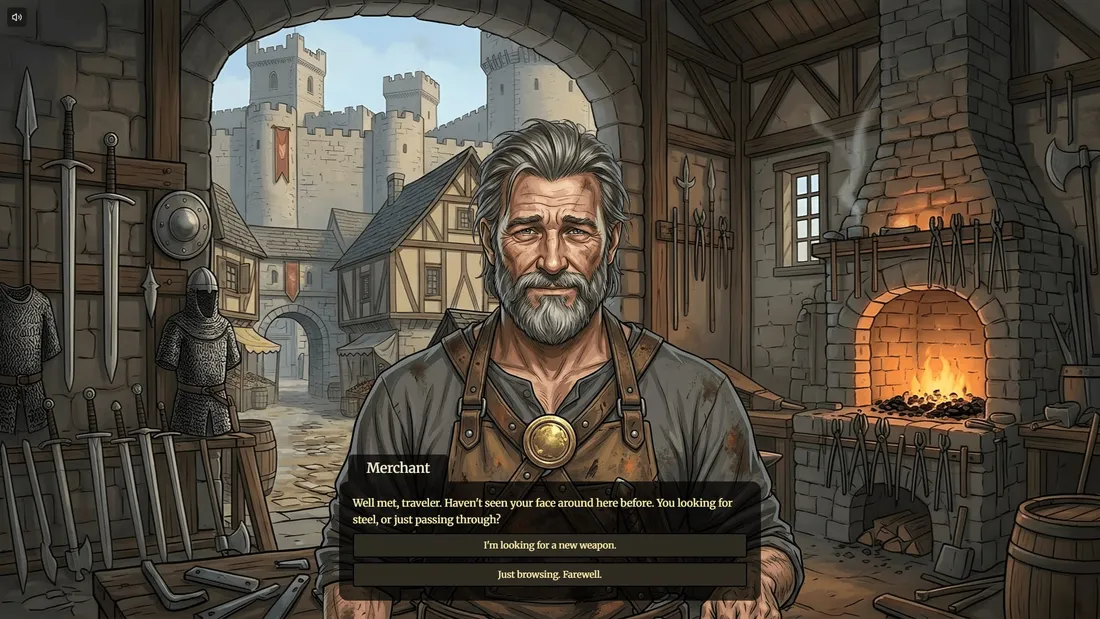
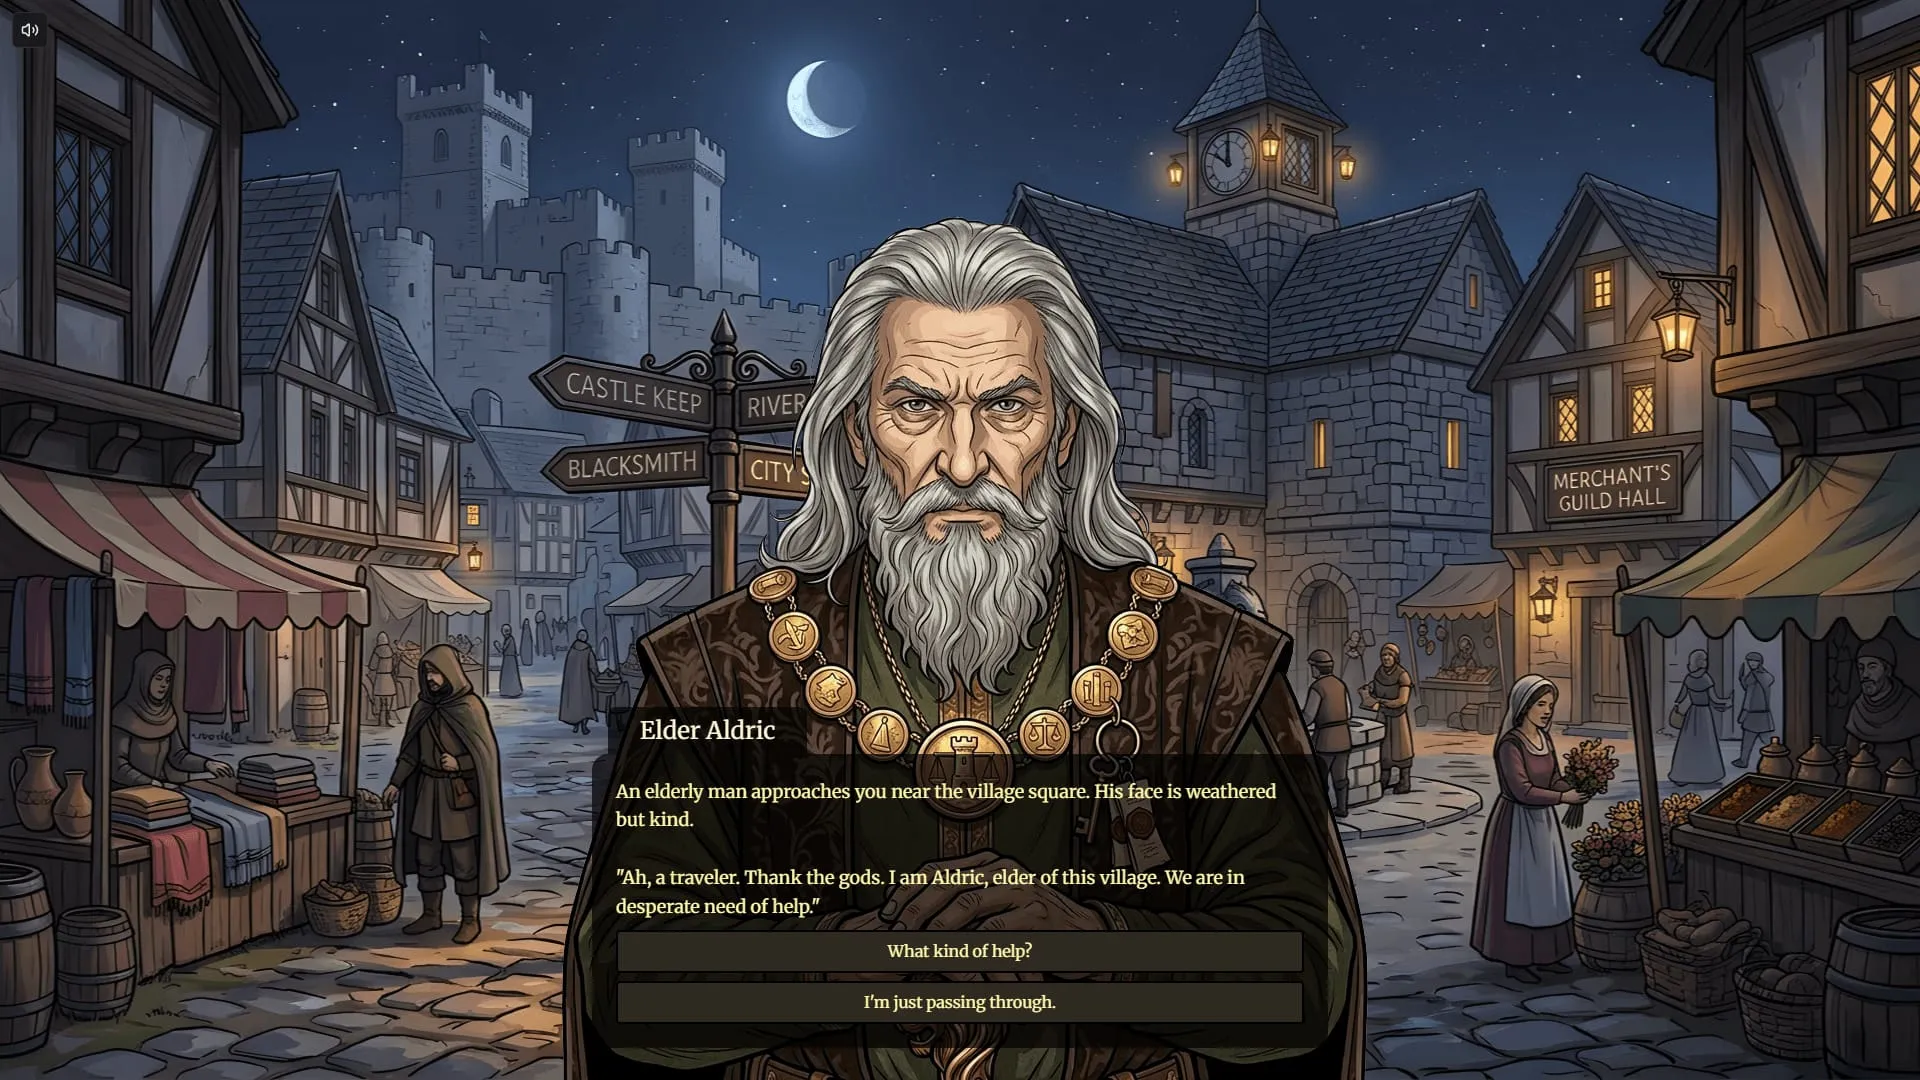
Back on the canvas, press D to drop a dialogue node. Assign the character you just made, then type the opening line. Something like "An elderly man approaches you near the village square." Drag a connection from the Start node to your new dialogue node and hit Play. That's a one-line visual novel.
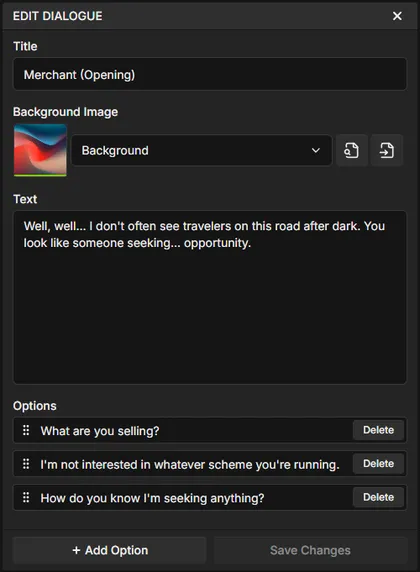
Step 4: Add Player Choices
On the same dialogue node add two options. "What kind of help?" and "I'm just passing through." Each option becomes its own output on the node. Drag each one to a new dialogue node with a different follow-up line. Play it again. You now have a branching story.
Step 5: Remember What the Player Did
Open the variables panel and create a boolean called helpedAldric, default false. When the player
picks the "help" branch, drop a Set Boolean node that sets helpedAldric = true. Your story now has memory. The
full variables guide goes deeper into patterns once you're
comfortable.
Step 6: Branch Based on Memory
Later in the story, drop a Branch node that reads helpedAldric. Wire the true output to a grateful
follow-up dialogue. Wire the false output to a colder one. Your game now reacts to things the player did hours
ago, which is the whole point of a visual novel.
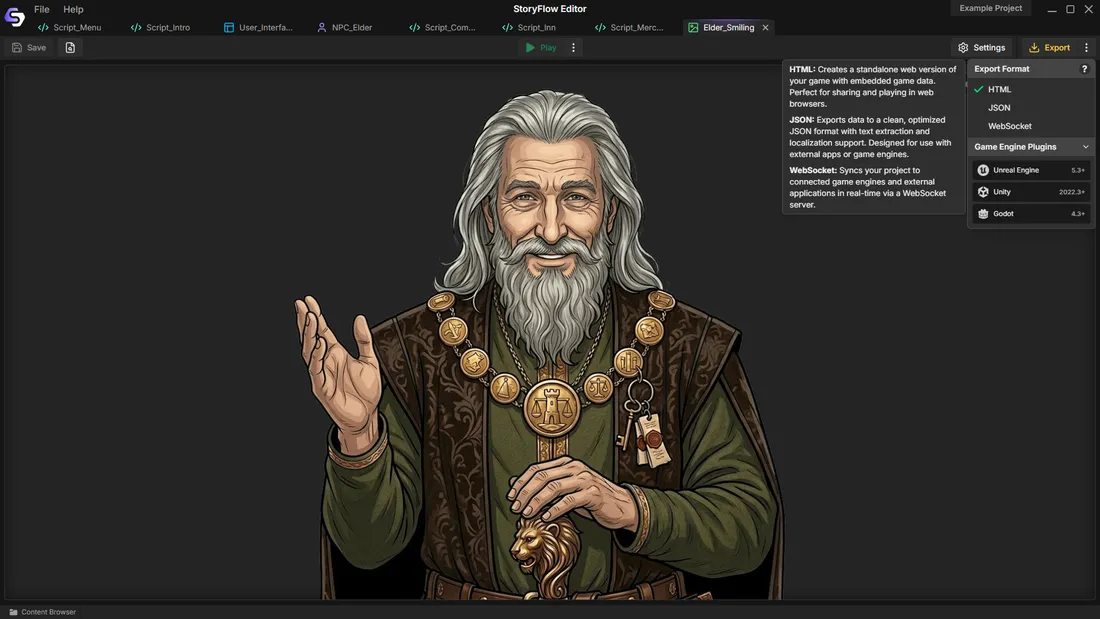
Step 7: Preview and Export
Hit Play any time to test without exporting. When the story is ready, export to HTML for a standalone playable file you can drop onto itch.io. Or export to JSON and import into Unity, Unreal Engine or Godot using the free plugins.
That's the entire workflow. The rest is repetition. Add dialogue. Add choices. Track state. Branch. Your job as the writer is to decide what those dialogues, choices and branches say.
No-Code Visual Novel Tools Compared (2026)
No single tool is "best". Each has a sweet spot, and the right choice depends on what you're shipping, how technical you are and how much polish you want at the end. The table below summarizes the four serious contenders; prices and licenses were verified at each tool's official store or documentation in June 2026.
| Tool | Code required? | Price & license | Exports to | Best for |
|---|---|---|---|---|
| Ren'Py | Yes — Ren'Py script (Python-based) | Free, open-source (MIT) | Windows, macOS, Linux, Android, iOS, web | Writers OK with light scripting who want maximum reach |
| TyranoBuilder | Drag-and-drop; TyranoScript for real logic | $14.99 (commercial, Steam) | Windows, Mac, browser; iOS/Android via 3rd-party tools | Kinetic novels and lightly-branching stories |
| Naninovel | No for basic (NaniScript / visual editor); C# for custom | $150 (Unity Asset Store) | Anywhere Unity builds (PC, console, mobile) | Unity studios shipping commercial VNs |
| StoryFlow Editor | No — 80+ visual node types | $30 one-time, lifetime updates | HTML (standalone) and JSON → Unity, Unreal, Godot | No-code authoring now with the option to scale into an engine later |
Ren'Py
The most established visual novel engine. Free, open-source under the MIT license, exports to every major platform and responsible for a long list of commercial VN hits. Wikipedia's Ren'Py article credits the engine with Doki Doki Literature Club (2017), Slay the Princess (2023), Scarlet Hollow (2021), Katawa Shoujo and Long Live the Queen, and renpy.org reports it has been used to make over 8,000 visual novels, games and other works. The catch is that you're writing code. The syntax is friendlier than Python, but you will read Ren'Py documentation and you will debug scripts. If you're comfortable with that, Ren'Py is hard to beat.
Best for: writers who don't mind a little scripting and want maximum reach.
TyranoBuilder
A commercial drag-and-drop builder ($14.99 on Steam) with a clean WYSIWYG preview. Its own store page says "no programming knowledge required" for the drag-and-drop tools, and that holds for linear or lightly-branching stories. The moment you need real conditional logic you drop into TyranoScript, its scripting language, so the "no code" promise has a ceiling.
Best for: kinetic novels and short interactive fiction with minimal branching.
Naninovel
A Unity asset ($150 on the Unity Asset Store) that bolts a writer-friendly authoring workflow onto a real game engine. You write scenes in NaniScript or its visual Story Editor with no programming for the basics; custom behaviour drops to a C# API. If you're already a Unity developer shipping a commercial VN, it's a strong pick. The catch is that you need Unity and the engine's ceiling is Unity's ceiling.
Best for: Unity studios shipping commercial visual novels.
NovelStudio and CloudNovel
Newer block-based tools. Both lean into "no coding required" and both deliver on it for simple stories. The catch is the closed ecosystem. Your project lives inside their tool and exports to their runtime. The second you want to publish on Steam under your own engine, you've outgrown them.
Best for: game jam entries and web-first visual novels.
StoryFlow Editor
Node-based visual scripting in a desktop app, priced at $30 once with lifetime updates. It ships 80+ specialized node types, writes to open JSON and standalone HTML, runs on Windows, macOS and Linux, and includes free plugins for Unity, Unreal Engine and Godot. It never asks you to write code. Node graphs take an hour or two to click for someone who's never used Blueprints, but most people are productive by the end of an afternoon.
Best for: creators who want no-code authoring now and the option to scale into a proper game engine later.
If you want a deeper technical breakdown including Twine, Ink and Yarn Spinner, our 6 best narrative design tools post covers more of the tradeoffs.
From Prototype to Shipped Game
Most visual novels start as HTML prototypes and graduate to a game engine for commercial release. The path looks like this.
- Draft in a visual tool. Move fast without engine overhead. HTML export is perfect for playtesting. Share a link, collect feedback, revise.
- Ship a demo on itch.io. The itch audience is forgiving of rough edges and happy to play browser-first games. You'll learn what works before you commit to anything bigger.
- Port to a game engine for Steam. When you're ready for the polish pass (custom UI, save systems, achievements, mobile builds) import your story JSON into Unity, Unreal or Godot. The plugins handle dialogue playback. You focus on feel.
The thing to protect is ownership of your story format. Tools that lock you inside their runtime make this path impossible. Tools that export to JSON or similar open formats let you graduate to a bigger engine whenever the project earns it.
Writing Lessons You'll Thank Yourself For
Tooling solves half the problem. The other half is writing, and most first-time VN authors learn these lessons the hard way.
Outline before you open the tool. Draft the whole story including major branches in a document first. Discovery writing inside a node graph leads to a mess. The tool is for implementation. Use paper (or a text file) to think.
Three choices is almost always the right number. Two feels binary. Four creates visual clutter. Three reads as "this is a real decision" without exploding your branch count.
Plan your reunifications. If every choice permanently forks your story, you'll hit exponential scene count fast. Let branches diverge for a scene or two, then converge back to a shared plot. The illusion of consequence matters more than actual divergence.
Set variables eagerly. Read them lazily. Whenever the player makes a meaningful choice, record it in a variable even if you don't have a use for it yet. Later callbacks ("you still wear the locket Alice gave you") are what make a visual novel feel alive, and they're impossible if you didn't write down the decision when it happened.
Playtest brutally. Every path. Every branch. Solo writers are blind to dead-end loops in their own stories. Test in the editor first, then hand a rough build to five friends and watch them play without speaking.
Publishing Your Visual Novel
When the game is done the publishing options in 2026 are mostly these.
- itch.io. Low friction, pay-what-you-want friendly, great for jam entries and demos. HTML export uploads directly.
- Steam. Higher reach, higher bar. You'll need a polished build, a trailer, capsule art and a paid Steam Direct fee. Most visual novels on Steam run through Unity, Unreal or Godot with a narrative plugin rather than raw HTML.
- Mobile. Ren'Py and Naninovel have the best mobile export paths. Node-based tools that export to Unity or Godot inherit their mobile support.
- Web hubs. CloudNovel and similar platforms host your game on their site. Convenient but you don't own distribution.
For a first commercial release the smart move is an itch.io demo followed by a Steam launch after the story is validated. You keep ownership, you keep revenue and you keep the option to iterate based on what early players actually said.
Frequently Asked Questions
Can you make a visual novel without coding?
Yes. Drag-and-drop and node-based editors let you build a complete branching visual novel by arranging dialogue, choices and logic visually instead of writing script. StoryFlow Editor ($30, no code) ships 80+ node types and exports to playable HTML. TyranoBuilder ($14.99) uses drag-and-drop blocks. Both let non-programmers ship a finished story.
What is the easiest no-code visual novel maker?
For genuinely zero-code authoring, node-based StoryFlow Editor ($30) and drag-and-drop TyranoBuilder ($14.99) are the easiest. TyranoBuilder is fastest for linear stories; StoryFlow scales better into heavy branching and exports to Unity, Unreal and Godot. Ren'Py is free but uses a scripting language, so it is not truly no-code.
Is Ren'Py hard for non-coders?
Ren'Py is free, open-source (MIT) and powers hits like Doki Doki Literature Club and Slay the Princess, but
it is a scripting language. You write label, jump and if statements in a text file.
Beginners can copy templates, yet any real bug means debugging code. If you want to avoid scripting entirely, a visual node
editor is the better fit.
How much does it cost to make a visual novel without code?
The software is cheap. Ren'Py is free, StoryFlow Editor is $30 once, TyranoBuilder is $14.99 and Naninovel is $150 on the Unity Asset Store. Art is the real cost: commission portraits on Fiverr or Skeb, or start with free CC0 packs from itch.io and replace them later. You can ship a first visual novel for the price of the tool alone.
Can a no-code visual novel be sold on Steam?
Yes. Most Steam visual novels run on Unity, Unreal or Godot with a narrative plugin rather than raw HTML. Build the story in a no-code editor, export to JSON, import it into the engine using a free plugin, then add the polish Steam expects (save systems, achievements, custom UI) and pay the $100 Steam Direct fee per game.
What is the difference between a visual novel maker and a game engine?
A visual novel maker handles narrative: characters, dialogue, choices, variables and branching. A game engine like Unity or Unreal handles rendering, physics, input and shipping to every platform. Tools that export open formats (StoryFlow to JSON, Ren'Py to native builds) let you author the story in a focused editor, then graduate to a full engine when the project needs it.
Start Writing
The tools are there. The audience is there. The only thing between you and a shipped visual novel is opening a blank canvas and placing the first dialogue node.
If you want to try the node-based approach described above, StoryFlow Editor is available on Steam and itch.io for Windows, macOS and Linux. A playable example project called The Beast of Millhaven ships with the editor, so you can open a complete story broken into nodes before writing your own. You can also play it in your browser first to see what the finished result looks like.
Pick a tool, write the outline, drop the first dialogue node. A visual novel won't write itself. But in 2026 it no longer needs you to write code either.
Related Posts

Enjoyed this post?
Subscribe to get notified about new articles and updates.